As a Showit designer who’s all about creating custom websites and premium Showit Templates, I often get asked how to get started with a Showit Template. When I design custom Showit Websites, I’ve got the whole process down. I install and setup the Showit template straight into the client’s Showit account. From beginning to end, no fuss.
Occasionally, someone asks me about adding an extra template or using a page layout from a different design.
For the Showit templates I have in the Alow Creative Template shop, it’s up to the client to set up and get things rolling with the template. That’s the beauty of DIY – it’s fast, easy, and cost-effective for your business.
Whether you want a simple setup, full customization of the Showit Template you grabbed, or a unique Showit website design created from scratch, don’t hesitate to contact me. I’m always here and happy to help.
And if you’re here to figure out how to install any Showit Template, whether Free, Paid, or Add-on, you’re in the right spot. Let’s dive into the good stuff. Keep reading!
If you’re unfamiliar, Showit is a super user-friendly platform that lets you design your website without messing around with fancy code.
So, what exactly is a Showit Template?
A Showit Template is like a ready-made bundle of website pages that you can easily install and give your unique touch.
If you’ve ever dabbled with WordPress, chances are you’ve gotten your hands on a template or two.
Installing Showit templates is a breeze; it’s as simple as getting a WordPress template up and running.
But here’s the game-changer – customising Showit’s templates is a whole new level of user-friendliness compared to tweaking a WordPress native template.
If you’re coming from the WordPress world, you’re in for a treat with the design freedom Showit delivers, unlike any other WordPress template.
If you are considering coming across from Squarespace and switching to Showit, check my post-
Showit vs. Squarespace and how to choose the Perfect Website Platform for Your Business.
So, what’s the scoop on Showit templates out there?
You’ve got options, like:
- Snagging any of the Free Showit Templates right from Showit’s marketplace (or anywhere else, for that matter).
- Checking out the Paid Showit Templates from Showit’s store.
- Exploring Premium Showit Templates available on cool platforms like the Alow Creative Collection.
- Diving into Add-on Templates – both the Free and Premium ones.
It’s a buffet of choices, and you’re in the driver’s seat!
How to install a Showit template:
Curious about installing a Showit Template? Let’s break it down, and there’s just one tiny difference based on where you’ve gotten the template from.
Here’s the details:
- If you’ve scored a Showit Store template or got one from the Alow Creative Templates shop, Etsy, Creative Market, you name it), there’s a little variation in the installation process.
- Say you’ve picked a freebie or paid for a designer template from the Showit store – guess what? This template automatically installs into your account like magic.
- Keep in mind, though, that the Showit market has a limit on how many templates they showcase.
- If you’re itching for a unique template, explore the treasure trove at Alow Creative. It’s a goldmine of Premium Showit Templates at affordable prices waiting for you to dive into.
Adding Website Templates and Free and Premium Add-on Showit Pages:
Now, let’s dive into the nitty-gritty of Free, Premium, or Add-on Showit Templates snagged from sources other than the Showit store.
Here’s the lowdown that’s true for all these templates: You need a Showit Share Key to work your installation magic within your Showit account.
But what’s a Showit Design Share Key, you ask?
It’s a string of characters (lots of letters and numbers) that you’ll pop into your account. When you paste in the Showit Share Key, you’re whisking away to import and add the free, premium, or add-on template into your personal Showit account library.
Now, if you’ve picked up a template from the Alow Creative store, straight after checkout, you will be directed to a page with your Share Key, bonus free downloads, and user guide resources.
So, are you ready for the Showit Share Key process on how to install a template?
Here’s how to roll with it:
Step 1: Copy the Showit Share Key;
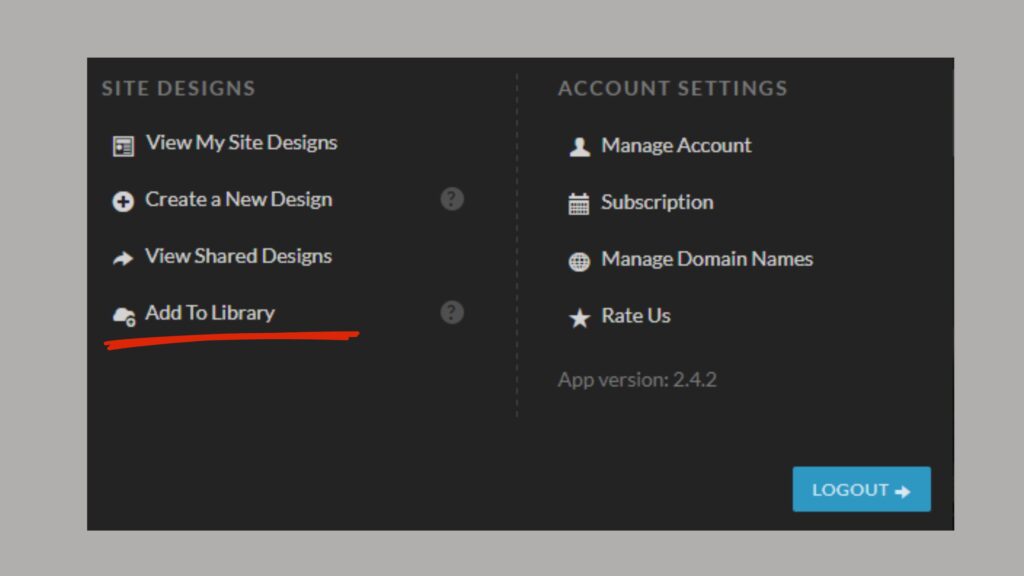
Step 2: Log into your Showit account and click on your name in the bottom left corner of your browser’s screen;
Step 3: Click that shiny “Add Design to Library” button;
And voila, you’re on your way to template paradise!

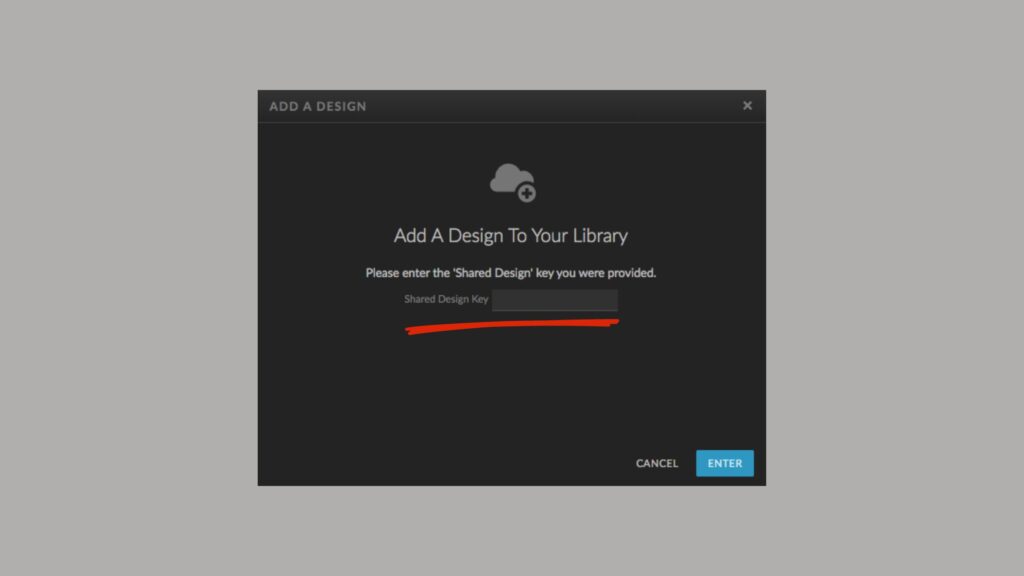
Step 4. Paste the Shared Design Key into the input box and press on the ‘Enter’ button;

Step 5. Preview and Add the Design into your Showit Library by pressing the ‘Add Now’ Button;

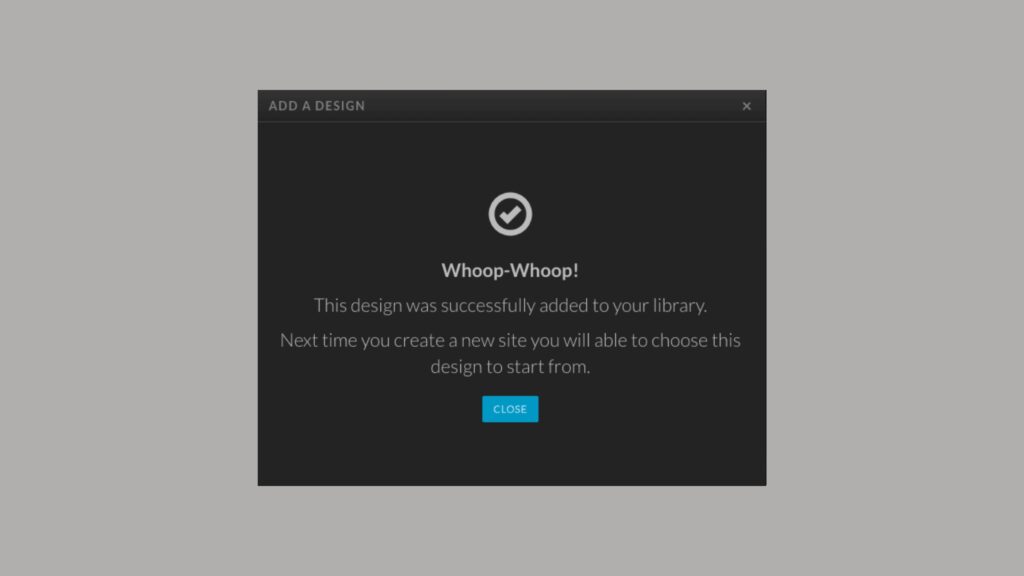
Step 6. The Design is installed into your account library! How easy was that!
You can find all of your newly crafted sites in the ‘View My Site Designs‘, no matter if they are a freebie, paid, or premium Showit Template. Even if your Showit website Designer spun a custom Showit website design just for you (just like I do for my clients).
Do you have an add-on template to bring into your existing Showit Website?
Here’s the details on how to add it to your design library:
When you nab a free or premium add-on Showit template, it’ll install like any full Showit template design. These add-on Showit templates are like puzzle pieces that slot perfectly into your existing website.
Picture them as layouts that amplify your site – think podcast pages, shop pages, course pages, or any extra page not already hanging out on your website.
To slip those add-on template pages into your own Showit world, keep tabs on the steps coming up next.
First things first, make sure you’ve already installed the add-on Showit template into your Showit account library.
Once it’s there, it’s time to blend it into your existing Showit account. Scroll below for the how-to, nestled in the section titled “How to install a Showit page layout from any other Showit Template Design.”
Now, how do you install a Showit page from another design?
One of the best things about Showit is its sky’s-the-limit approach. The platform isn’t just user-friendly; it’s a canvas for your wildest creative visions.
Ready for the jaw-dropper? You can blend any layout from any template into your Showit account. Yep, you heard that right – it’s one of the dazzling tricks up Showit’s sleeve.
This feature is a true heart-stealer for many website owners. For instance, imagine Showit website owners who kicked off with a static site with no blog in sight. Surprise, surprise – they can effortlessly fold in any blog template they fancy right into their existing site.
Oh, and before you dive in, make sure you’ve tapped that “import my fonts and styles” option. It’s your secret weapon to match your existing typography and colour scheme with the add-on Showit template design.
It’s that easy!
How to Install & Setup your Showit Template
